The premise was a remote junction in Australia was in desperate need of traffic control and armed with a Particle Argon, a few LEDs and some code we needed to provide a solution.
Disclaimer: There are a few glaring issues with the way the project currently works. This is more of a proof of concept for leveraging cloud variables and functions. Therefore this wouldn’t be something you’d roll out into a production environment even if Argon’s & LEDs were deemed suitable for traffic management!
For those that don’t know, the Argon is Particle’s latest IoT (Internet of things) development board. I won’t bore with the details but suffice to say it enables you to do a lot of cool things remotely over the internet, like um flashing lights for instance?!?
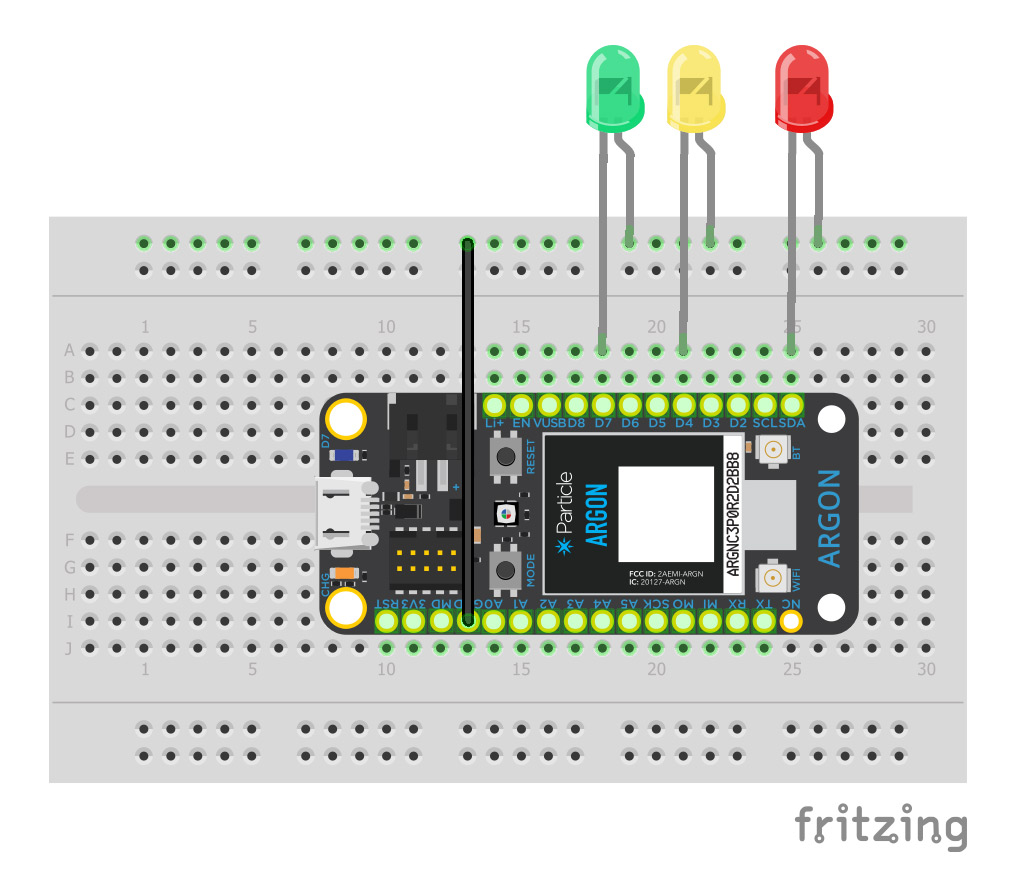
As per the schematic, I’ve simply connected the Argon to a breadboard and plugged three LED’s into the general purpose input/output (GPIO) pins. I’ve chosen pins D0, D4 & D7 as I wanted to get the lights as uniform as possible. I’ve also connected them via a common ground from the Argon. I haven’t used any resistors as I’m using a low powered USB port and the LEDs aren’t bright. However I would recommend the use of a resister to limit the current if you’re concerned about burning them out.
The power of cloud variables and functions!
One of the great things about the Argon is Particle’s ecosystem that handles all the security, connectivity and the heavy lifting via their Cloud API. The two areas we are specifically leveraging in this project are cloud functions, encapsulated code which can be remotely called, and cloud variables which can be used to store data remotely.
Below is the firmware which is flashed to the Argon. The code is very simple and well commented so it should be clear what each line does.
/*
 * Project CloudFlasher
 * Description: Simple interface allows user to update the status of LEDs connected to Argon via the cloud
 * Author: Chris Bounsall
 * Date: 07/04/20
 */


// Pin setup for LEDs
int redLED = D0; // variable for Red LED pin
int yellowLED = D4; // variable for Yellow LED pin
int greenLED = D7; // variable for Green LED pin

// Global/Cloud variables for LED status
bool redStatus = false; // setting initial status to false
bool yellowStatus = false; // "
bool greenStatus = false; // "


// setup() runs once, when the device is first turned on.
void setup() {
  // register cloud function, this function is called remotely
  Particle.function("flashLED", flashLED);

  //register cloud variables, these store the state of each LED in teh cloud
  Particle.variable("redStatus", &redStatus, BOOLEAN);
  Particle.variable("yellowStatus", &yellowStatus, BOOLEAN);
  Particle.variable("greenStatus", &greenStatus, BOOLEAN);

  // setup pins
  pinMode(redLED, OUTPUT);
  pinMode(yellowLED, OUTPUT);
  pinMode(greenLED, OUTPUT);

  // start serial for debugging
  Serial.begin(9600);

}

// loop() runs over and over again, as quickly as it can execute.
void loop() {
  // The core of your code will likely live here.
}

// function updates the cloud variables and toggles LEDs
int flashLED(String colour)
{
  Serial.println("Colour: " + colour); // debugging

  // toggle selected light
  // save status of LED in cloud variable.

  int led; // holds targetted LED
  int status; // HIGH = 1, LOW = 0

  if(colour == "red") // code for clicking red button
  {
    redStatus = (redStatus) ? false: true; // toggle global variable, if status is false set true and vice versa
    led = redLED;
    status = (redStatus) ? 1 : 0;
  }
  else if(colour == "yellow") // code for clicking yellow button
  {
    yellowStatus = (yellowStatus) ? false: true; // toggle global variable, if status is false set true and vice versa
    led = yellowLED;
    status = (yellowStatus) ? 1 : 0;
  }
  else // code for clicking green button
  {
    greenStatus = (greenStatus) ? false: true; // toggle global variable, if status is false set true and vice versa
    led = greenLED;
    status = (greenStatus) ? 1 : 0;
  }

  digitalWrite(led, status); // set the status of the LED
}
As you can see, there’s several global variables instantiated which hold references to the pins and the status of each LED. The setup function initialises the cloud function (flashLED) and the cloud variables (redStatus, yellowStatus & greenStatus). Next we setup the pin mode for our LEDs to output. Finally, we start serial communication for debugging purposes, this is a completely optional step. As you can see the loop remains empty as we aren’t actively doing anything other than waiting for remote calls to flashLED.
Let’s explore the cloud function aptly named flashLED. This function simply takes a single argument which defines the colour of the LED being targeted. Each branch initially toggles the cloud variable using a ternary operator, then updates local variables to set the LED and its associated on/off status. Finally using digitalWrite the selected LED is changed to its new state.
The User Interface
The UI is very simplistic. It leverages bootstrap for the styling side (CSS) and jQuery for the RESTful calls and updating styling.
<!-- Replace your-device-ID-goes-here with your actual device ID
and replace your-access-token-goes-here with your actual access token-->
<!DOCTYPE>
<html>
<head>
<link rel="stylesheet" href="https://maxcdn.bootstrapcdn.com/bootstrap/4.4.1/css/bootstrap.min.css">
https://ajax.googleapis.com/ajax/libs/jquery/3.4.1/jquery.min.js
<script>
// global variables
var redStatus = false;
var yellowStatus = false;
var greenStatus = false;
$(document).ready(function(){
// get global variables - then update local variables accordingly and run update function for styling
$.when(
$.ajax( "https://api.particle.io/v1/devices/YOUR_DEVICE_ID/redStatus?access_token=YOUR_TOKEN"),
$.ajax( "https://api.particle.io/v1/devices/YOUR_DEVICE_ID/yellowStatus?access_token=YOUR_TOKEN"),
$.ajax( "https://api.particle.io/v1/devices/YOUR_DEVICE_ID/greenStatus?access_token=YOUR_TOKEN")
).done(function( a1, a2, a3 ) {
// update variables to match cloud variables
redStatus = a1[0].result;
yellowStatus = a2[0].result;
greenStatus = a3[0].result;
updateLEDStyle(); // run update led style
});
$(".btn").click(function(){
// post to the cloud function, turns LED on and updates variable.
$.ajax({
type: 'POST',
url:'https://api.particle.io/v1/devices/YOUR_DEVICE_ID/flashLED?access_token=YOUR_TOKEN',
data:"args="+this.id
});
// toggle the jscript variable (not entirely accurate but better than waiting for the cloud var to update)
switch(this.id) {
case "red":
redStatus = (redStatus) ? false : true;
break;
case "yellow":
yellowStatus = (yellowStatus) ? false : true;
break;
case "green":
greenStatus = (greenStatus) ? false : true;
break;
}
updateLEDStyle(); // run update led style
});
});
// function to update button styles depending on status
function updateLEDStyle(){
if(redStatus)
$("#red").addClass("bg-danger").removeClass("btn-secondary"); // add bg-danger, remove btn-secondary
else
$("#red").addClass("btn-secondary").removeClass("bg-danger");
if(yellowStatus)
$("#yellow").addClass("bg-warning").removeClass("btn-secondary"); // add bg-warning, remove btn-secondary
else
$("#yellow").addClass("btn-secondary").removeClass("bg-warning");
if(greenStatus)
$("#green").addClass("bg-success").removeClass("btn-secondary"); // add bg-success, remove btn-secondary
else
$("#green").addClass("btn-secondary").removeClass("bg-success");
}
</script>
</head>
<body>
<div class="row pt-3">
<div class="col-12 text-center">
<h2>Toggle LEDs on & off</h2>
</div>
</div>
<div class="row pt-5">
<div class="col-md-4"></div>
<div class="col-md-4 text-center"><button type="button" id="red" class="btn btn-secondary">Red LED</button></div>
<div class="col-md-4"></div>
</div>
<div class="row pt-3">
<div class="col-md-5"></div>
<div class="col-md-2 text-center"><button type="button" id="yellow" class="btn btn-secondary">Yellow LED</button></div>
<div class="col-md-5"></div>
</div>
<div class="row pt-3">
<div class="col-md-4"></div>
<div class="col-md-4 text-center"><button type="button" id="green" class="btn btn-secondary">Green LED</button></div>
<div class="col-md-4"></div>
</div>
</body>
</html>
To keep things simple, Bootstrap and jQuery are included in the documents head, followed by inline JavaScript which leverages jQuery’s document ready function. Once the document has loaded, three AJAX calls are made to get status of the three global variables. As per the disclaimer, the shortfall of doing it like this means the status of the LEDs are only updated when the page is refreshed. Also note the calls to Particle (api.particle.io) must include the ID of your device and an access token. The access token prevents unauthorised users from interfacing with your device.
Once the AJAX calls return, the local variables are updated in line with the cloud variables. The helper function updateLEDStyle is then called to update the styling of the interface. This uses default bootstrap classes to style the buttons to match the status of the LEDs.
Finally a click listener is applied to the buttons via their class (btn). This listener simply makes an AJAX call to the flashLED, passing the colour of the LED which should be updated. As you can see it passes the id of the button which was clicked and the id’s of the buttons are set to correspond with the colour they control. The listener also toggles the status of the LED and then calls the updateLEDStyle helper once more to update the UI styling.
Overall it’s still quite amazing to think that clicking a button on a webpage located on my computer, can send a message across the globe to Particle’s servers and then back to again to the Argon in a fraction of a second. As a proof of concept the solution works well, although as mentioned there’s a number of caveats which may be fixed in a future version.
All code and content created by Chris Bounsall.