A recent major project required the creation of a system that would be capable of collecting data from a wide range of sensors, acting upon that data and also allowing the handling of requests from a user in real-time.
I decided to build what I labelled the ‘Smart Greenhouse’. Simply put it was a small greenhouse contained in a fish tank which contained various sensors for temperature, humidity, soil moisture, etc. It also had a dashboard for the user so they could see historical data, set thresholds which the system would respond to (i.e. the moisture level which triggers watering, or temperature that triggers venting) and also manually trigger venting and watering via overrides in real-time.
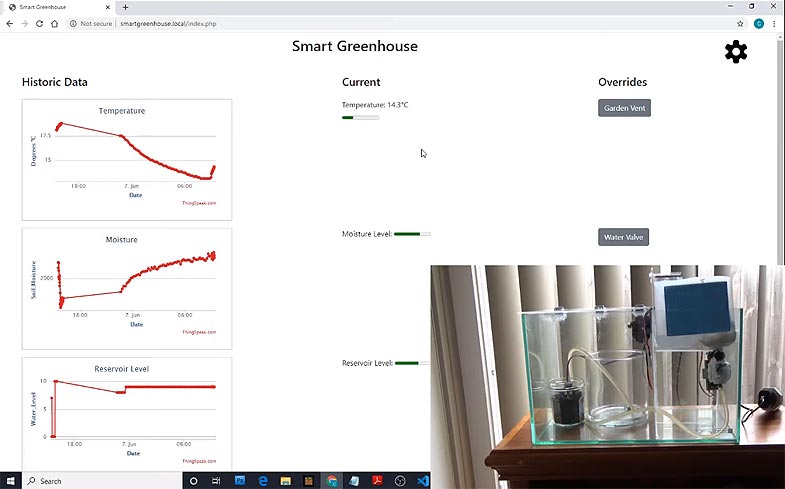
Smart Greenhouse project and dashboard
Without getting too much into creation of the actual project itself, I’d like to focus on the implementation of multithreading to provide the required project functionality. Slight caveat, whilst Particle’s Argon and Photon development boards both allow multithreading, it’s not officially supported.
The Demonstration Project
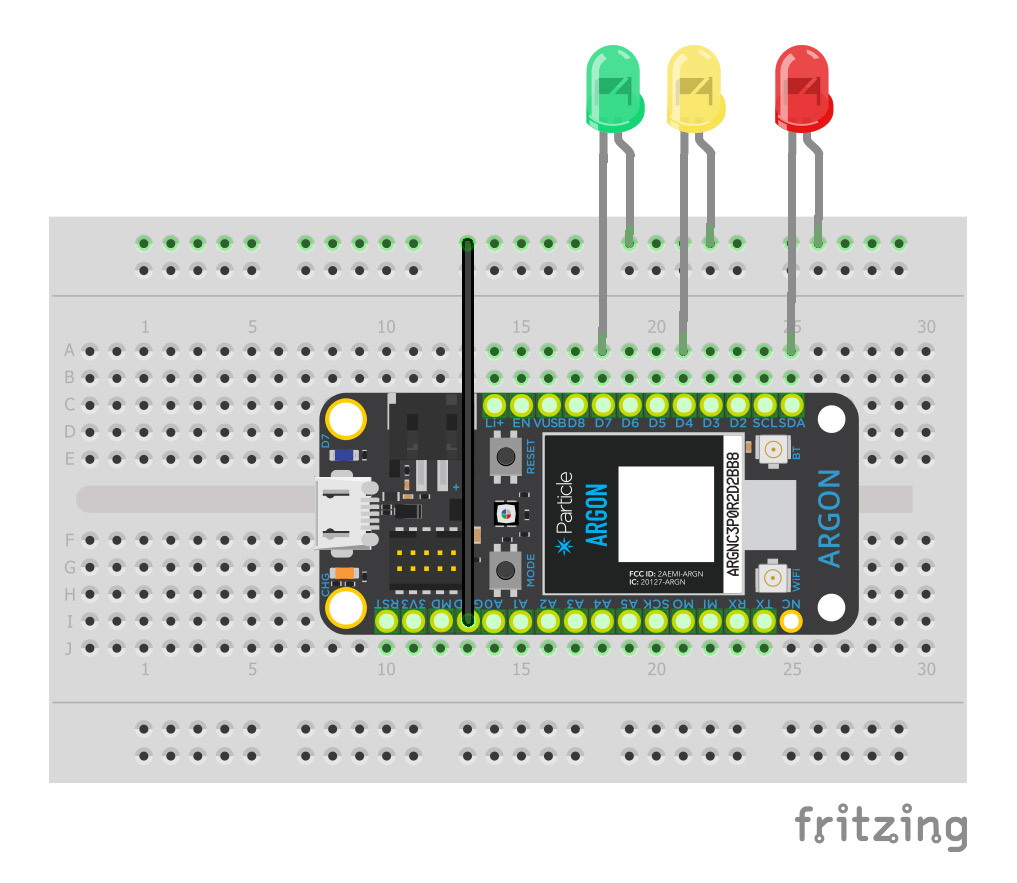
I’ve created a simple demonstration project which shows multithreading in use. Using the same setup as my controlling leds from the internet project, three LEDs are connected to the Argon, with each being fired on their own thread.
Overview of Project
The project code can be found here. I will conduct a brief overview of parts of interest below. The first section of interest is the multithreading setup which begins on line 16.
//Multithreading
SYSTEM_THREAD(ENABLED); //multi threading, system runs on its own thread
void preSetup(); // startup function to register mutex before setup is called
STARTUP(preSetup()); // mutex must be initialised before setup
void thread1Function(void *param); // declaration of thread1 function
void thread2Function(void *param); // declaration of thread2 function
Thread thread1; // thread 1
Thread thread2; // thread 2
os_mutex_t mutex; // mutex object
The second line enables the system thread, this is what allows multithreading. A placeholder for the preSetup function is then created, this is imperative for the creation of the mutex object. Basically when the Argon first powers on all threads are started, meaning that without calling a special startup function the mutex object is referenced before it’s instantiated. To get around this the preSetup function is called first, allowing for the creation of the object. Finally declarations for the 2 extra threads are made.
// System setup function
void setup() {
    // SERIAL
    Serial.begin(9600); // Starts the serial communication

    // Cloud Function
    Particle.function("callThread2Function", callThread2Function); // allows realtime calling to thread 2

    // Multithreading
    thread1 = Thread("thread1", thread1Function); // instantiation of thread 1
    thread2 = Thread("thread2", thread2Function); // instantiation of thread 2

    // setup pins
    pinMode(redLED, OUTPUT);
    pinMode(yellowLED, OUTPUT);
    pinMode(greenLED, OUTPUT);
}
Line 37 is used to create the cloud function that will be called to unlock the mutex, allowing the third thread to execute. Lines 40 & 41 reference the functions each thread will run. These functions will continue to execute whilst the device is powered on.
// System loop function
void loop() {
    // system thread
    flashLED(greenLED, 3); // flash green led 3 times
    delay(3000); // wait 3 seconds
}
Line 49-54 covers the default loop function, this is executed on the system thread and merely calls the flashLED helper function to flash the green LED three times before halting for three seconds.
// Calls flashLED every X seconds determined by varDelay variable
void thread1Function(void *param) {
	while(true) {
        // do stuff
        flashLED(yellowLED, 5); // flash yellow led 5 times
        os_thread_delay_until(&lastThreadTime, varDelay);	// Delay X seconds between cycles
	}
	// You must not return from the thread function, once thread starts it should never end...
}
This is the function for thread 1. A delay is used to halt execution of the thread for a determined amount of time (signified by the varDelay variable) before calling flashLED to flash the yellow LED five times.
void thread2Function(void *param) {
	while(true) {
        os_mutex_lock(mutex); // lock mutex, code runs once
        WITH_LOCK(Serial) { // lock serial to thread
            Serial.println("Function 2 called");
        }
        flashLED(redLED, 1); // flash red led 1 time
	}
	// You must not return from the thread function, once thread starts it should never end...
}

// function triggered via cloud, unlocks mutex which triggers thread2Function
int callThread2Function(String arg) {
  Serial.println("MUTEX UNLOCK");
  os_mutex_unlock(mutex);
  return 1;
}
Thread 2’s function uses a mutex object to halt execution. The mutex is unlocked by a call to the cloud function aptly named callThread2Function. Once the mutex is unlocked flashLED is called again this this time referencing the red LED and only flashing a single time.
// Flash passed in LED x amount of times
void flashLED(int targetLED, int cycles){

    for(int x = 0; x < cycles; x++){
        digitalWrite(targetLED, 1); // turn on
        delay(500); // delay half a second
        digitalWrite(targetLED, 0); // turn off
        delay(500); // delay half a second
    }
}
Finally the simple helper function flashLED which takes two parameters, the target LED and the number of cycles.
Demonstration of Project
Quick demonstration video of the project